Remote Environment Configuration
Overview
Remote Environment feature has gone through substantial improvements in Atria v15 to simplify communication between environments as well as network infrastructure implementation. You can create a new customer environment in a matter of just copying a script and pasting it on your customer's directory to establish connection between Atria and your customer's private environment. In this document, we are going to show you how you can make your environment ready to run remote environment setup scripts.

This document is the last part of Atria installation process. It is important to ensure you have completed the steps in the Clean Installation (Fresh Install) or Upgrade (Upgrade to v15) before proceeding to next step.
Network Diagram
Environment Setup Configuration Page
Before installing components on Remote Locations, installer packages need pre-setup configurations. This configuration page indicate how installer packages will communicate with Atria during component installation.
The screen has 3 sections:
Section | Title | Field | Field Description | Notes |
1 | Feed Configuration | Feed Url | URL where to download installer packages | Provided by Atria |
Feed User | The user account used in Feed URL authentication | An email address showcasing your domain | ||
Feed Token | This token provides access to the Feed URL | Provided by Atria | ||
2 | External Urls | External API Url | Atria Portal URL | This address has to be routable from remote environment |
Messaging Url | URL to Provisioning Server hosting RabbitMQ service | This address has to be routable from remote environment | ||
3 | RabbitMQ Configuration | Management Url | URL to Provisioning Server hosting RabbitMQ Management service | This address has to be routable from remote environment |
Please enter the values in the fields and click on Save to store the values and make your environment ready to handle remote environment setup scripts.
Remote Location Configuration
Create the Location
A "Location" is a place holder for Customers to exist. Below is a brief description on different Location types
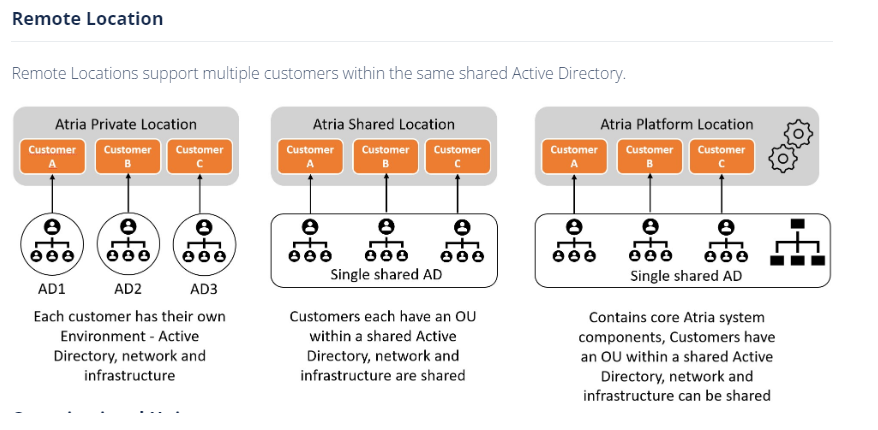
Navigate to Configuration > System Manager > Location and click Add.
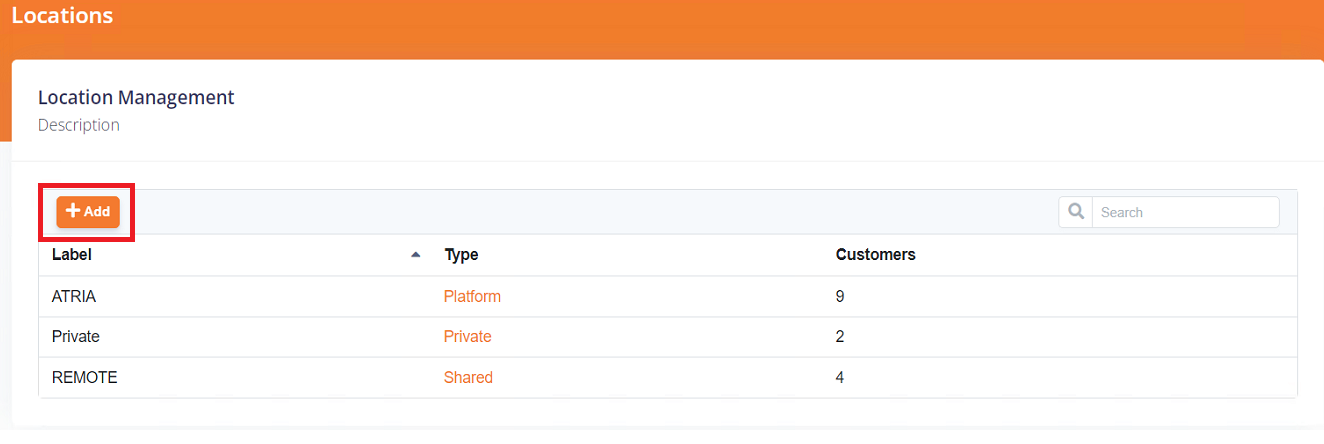
Fill up the fields and specify the appropriate Location type that best describes the Remote Environment, click Save.
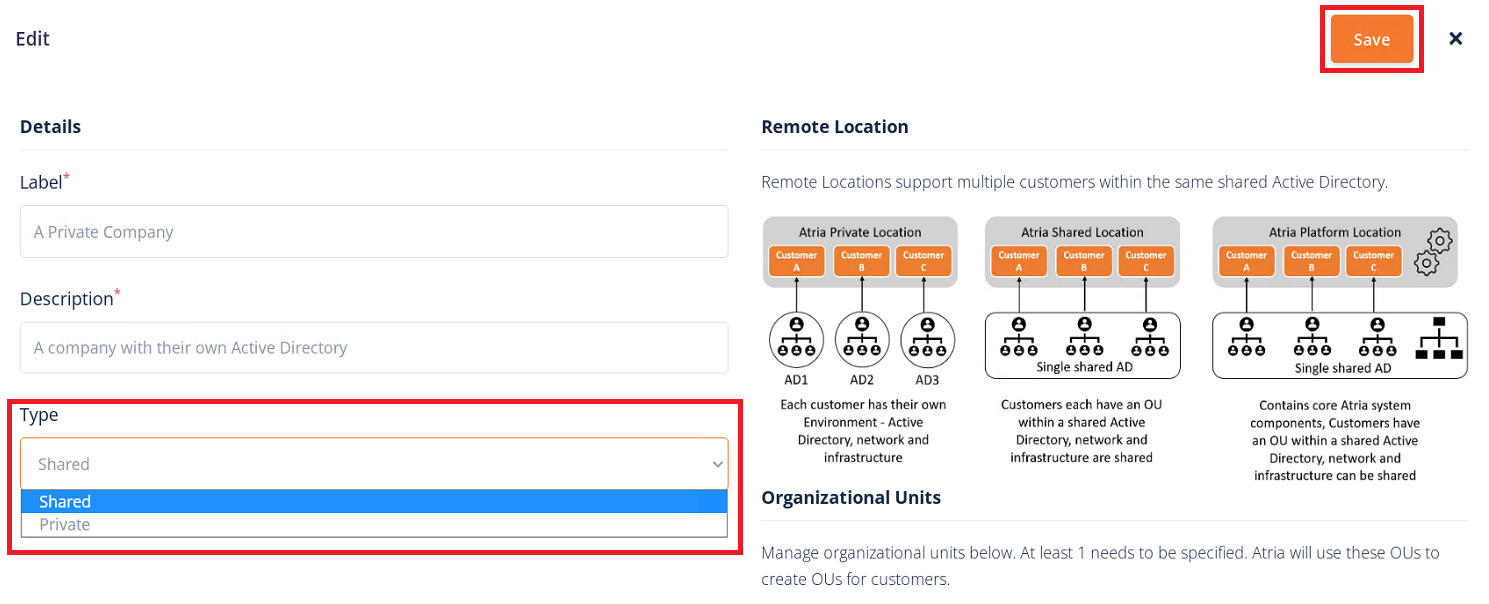
Fill up the fields and specify the appropriate Location type that best describes the Remote Environment, click Save.
*If a new Shared Location is created, it will create the Remote installation script without creating a customer first.
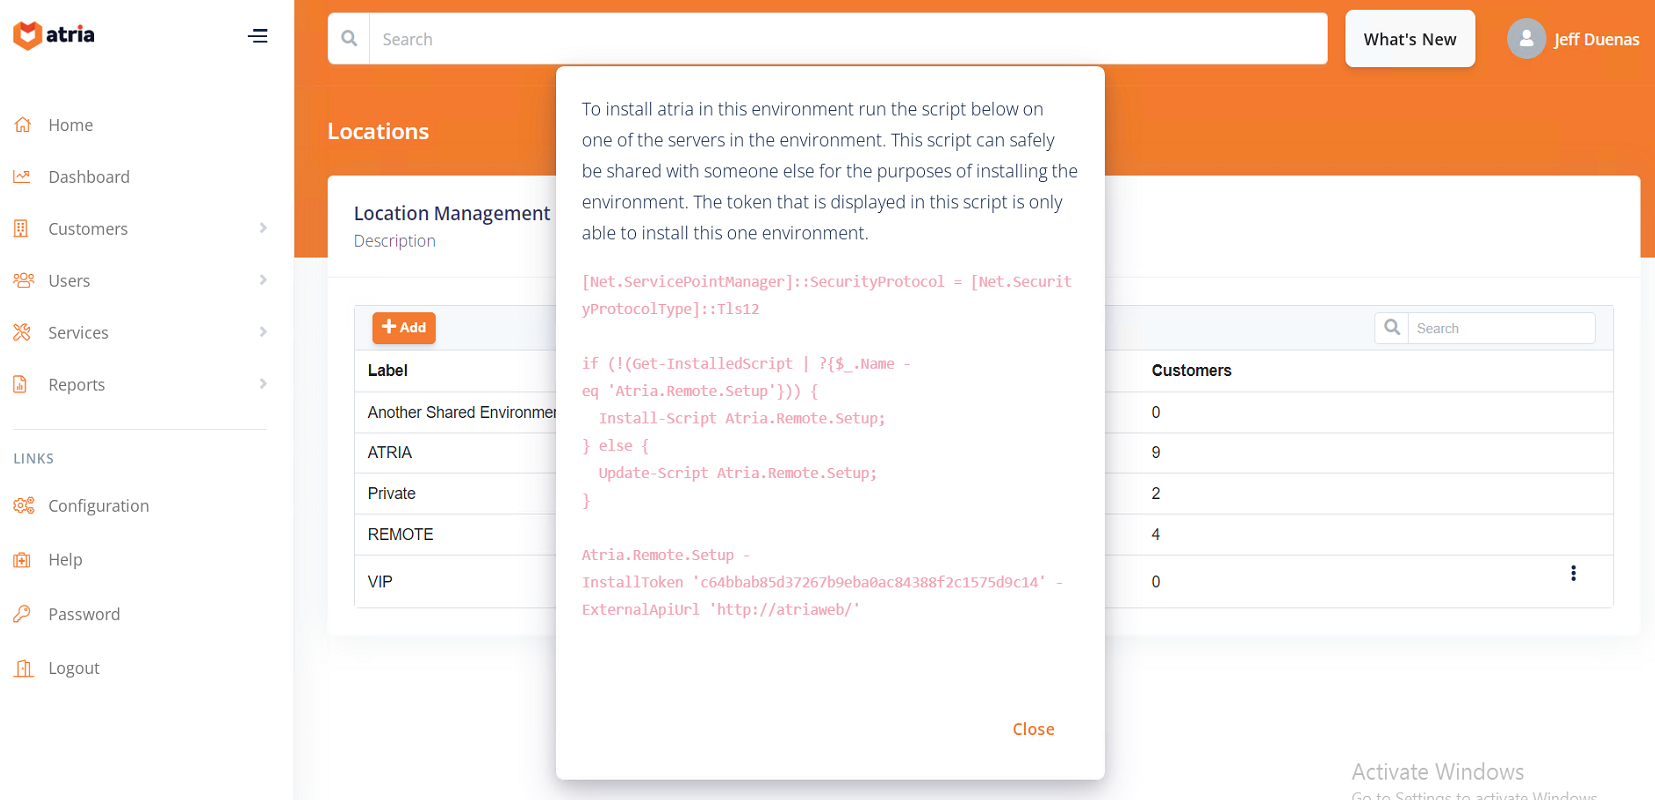
Install the Atria components in remote environment
Using the created installation script, run the script on the Remote environment where you want the components to be installed.
*For Private/Dedicated Customers, you need to create a "Dedicated Customer" first in the portal. See https://support.automate101.com/portal/en/kb/articles/creating-a-new-remote-dedicated-customer
*For Private/Dedicated Customers, you need to create a "Dedicated Customer" first in the portal. See https://support.automate101.com/portal/en/kb/articles/creating-a-new-remote-dedicated-customer
Verify Atria components installation
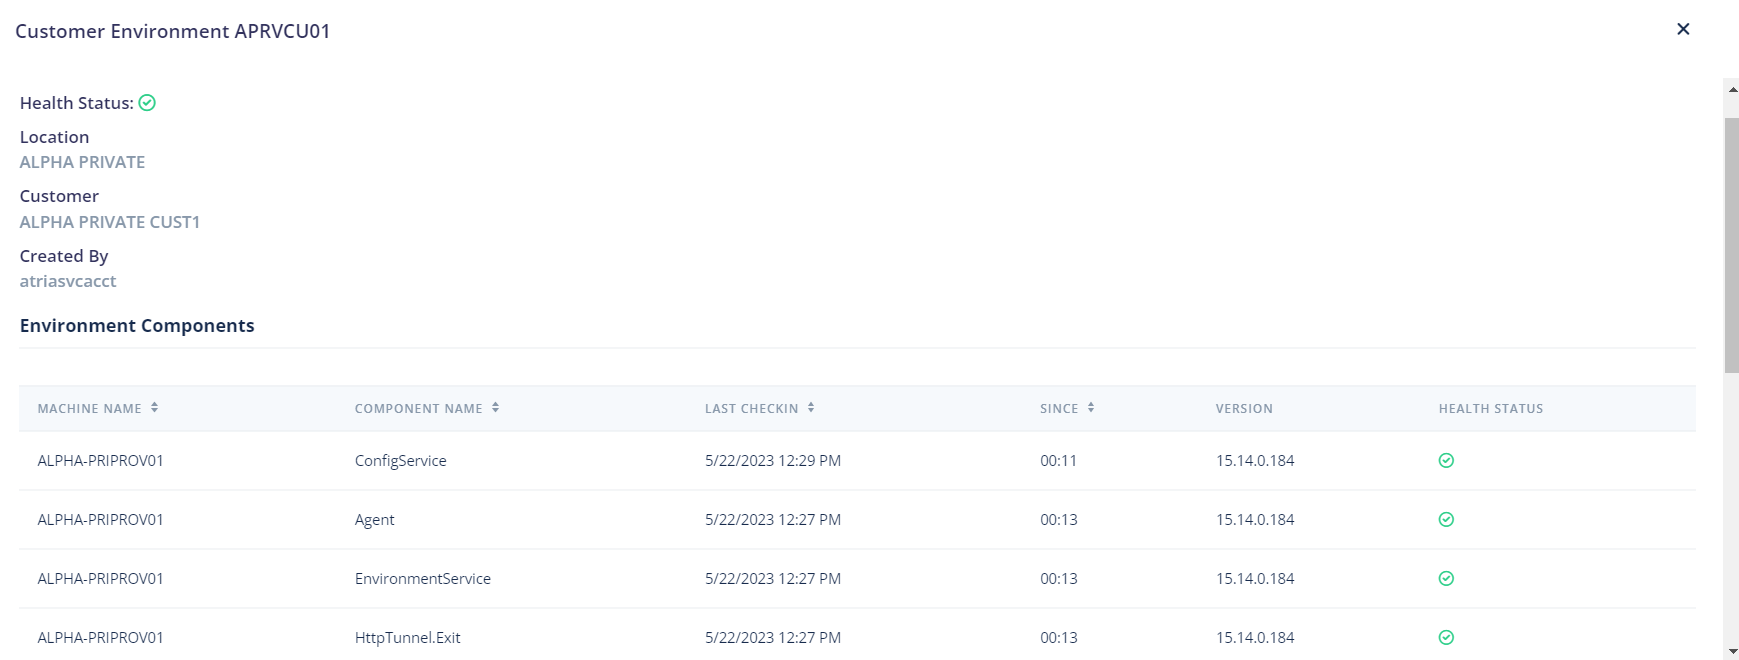
Once installation is done, you can verify the status of the components in Atria portal's Configuration > System Manager > Environments page
*As shown on the example, you can see how many components are installed on the Location and if have issues.
Select the customer environment that you created, and you will see information similar to below.
Server Connections Configuration
Server Connections are the means of communicating between the Atria Platform and Remote Environment. For a Location to be managed a minimum of Active Directory or "Directory" connection is required.
There are 2 ways how the Platform can communicate with the Directory;
1. Direct
-The designated Server name should be resolvable from the Atria Web and Provisioning server
-The designated communication port and protocol should be accessible from the Atria Web and Provisioning server
-The designated communication port and protocol should be accessible from the Atria Web and Provisioning server
-Applicable for Shared Locations

2. AtriaHttpTunnel
-The communication is passed to the Provisioning Server using the specified port and protocol
-The communication is passed to the Provisioning Server using the specified port and protocol
-The Provisioning server tunnel the communication using RabbitMQ
-Applicable for Private Locations

Create the Directory Server Connection

*By default, a Directory connection using AtriaHttpTunnel is automatically created after the creation of a Location.
If you created a "Private Location" no need to do the step 1-6.
1. Add the server on the Server list, Configuration > Servers
-Make sure you have selected the appropriate Location Filter where you want to add the server
-Make sure you have selected the appropriate Location Filter where you want to add the server
-Click Add Server
-Enter the Server name and click Add Server
-Make sure the Alias name of the Server is resolvable from the Atria Web and Provisioning Server and click save.
-Make sure the Alias name of the Server is resolvable from the Atria Web and Provisioning Server and click save.
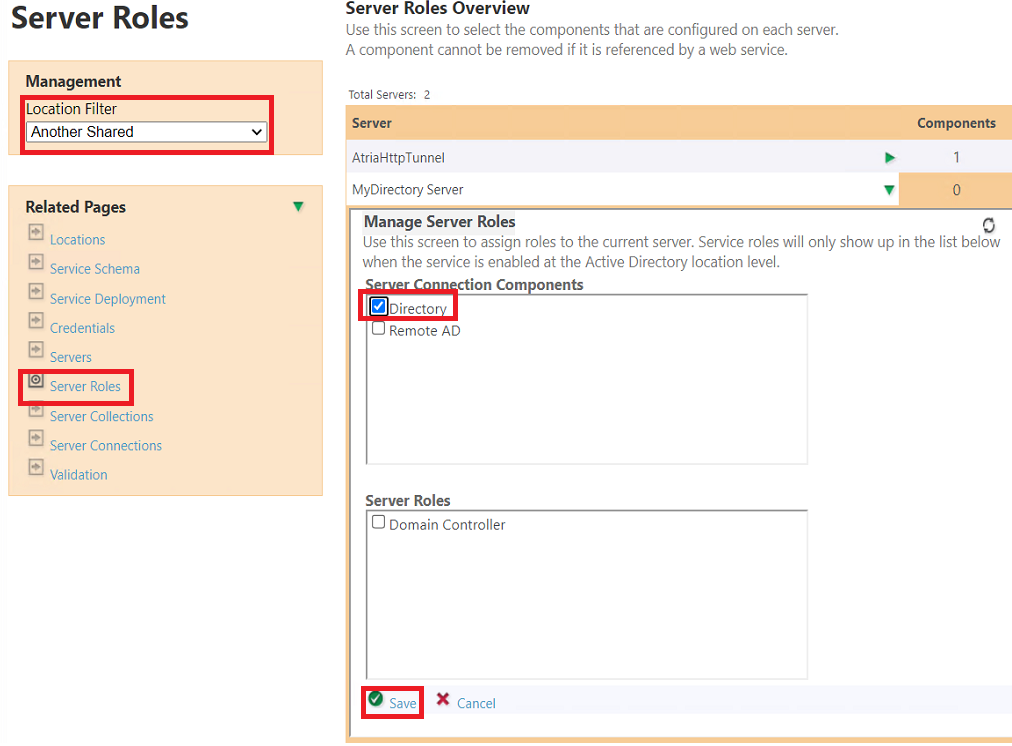
2. Give the new Server the "Directory" Role, Configuration > Server Roles
-Select the Server
-Check the Directory and click Save
3. From the Remote Environment where the Atria components are installed open an elevated x64 Powershell and run the command below
3. From the Remote Environment where the Atria components are installed open an elevated x64 Powershell and run the command below
> cd C:\Windows\System32\inetsrv
> .\appcmd.exe list apppool "Atria DirectoryWS AppPool" /text:*
Take note of the username and password
4. Add the credentials, Configuration > Credentials
-Enter the credential information you got from the powershell
5. Create the server connection, Configuration > Server Connections
-Select Directory as Server Role
-Select Directory as Server Role
-Select the appropriate Server you added
-Select the credential you added
-Select the credential you added
-Specify the Protocol and Port (By Default, Atria uses http and port 8095) click save
6. Validate if the connection is successful.

*AtriaHttpTunnel connections cannot be validated using the Test connection.
Summary
In this document we simply configured Atria to run remote environments setup scripts. This was the last step in Atria Clean Installation
If you have any questions or you came up with any issues regarding Atria, feel free to communicate and share with us at: Support@getatria.com
Related Articles
Updating Remote Environments via Atria Update
Overview Coming into Atria v15.2, there is now a feature to update the Remote Environments Components for Atria without any login interaction needed into the Atria remote servers. This means, instead of needing to log into each different Atria ...How to configure Azure AD Custom Tenant Configuration Scripts
Overview As part of the Atria Azure AD Service Sync Policies, you can assign custom configuration scripts that will be run each time the service is provisioned. This is useful to ensure your customer's tenants are always configured with your ...Moving RabbitMQ_BASEPATH to a Directory Instead of the Default User Profile
Overview By default when installing and configuring RabbitMQ, the BASEPATH for all config, logs, plugins, and instances are pointed to the %appdata% of the User that did the installation. Using this article, the RABBITMQ_BASEPATH will be moved to a ...Atria Platform v15+ Update Guide for Legacy Versions
Overview This article outlines the upgrade process for the Atria Platform. Applies To Atria 12.6+ Atria 12.11+ Atria 12.13+ Atria 12.14+ (Early Adopters) If environment is still on CPSM, kindly coordinate this with Atria Support System Requirements ...How to Customize Display Name Patterns
Overview By default, Atria's Display Name Pattern is set to First Name Last Name format. This is used to default the Display Name when creating new users. This guide shows how to customize Display Name Patterns in Atria to meet the needs of ...